allowed you to edit Icons and Cursors, Compress Files, Create and modify Graphics & Images, Automate and Secure Your System, Customize Your Desktop, and more…
see more about CursorArts programs below
|
|
|
|
|
|


see more about CursorArts programs below
|
|
|
|
|
|
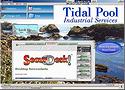
![]() SecurDesk! LV lets you create your own custom desktop environment for any version of Windows. Lock down icons, buttons images and hotspots onto an interface of your own making.
SecurDesk! LV lets you create your own custom desktop environment for any version of Windows. Lock down icons, buttons images and hotspots onto an interface of your own making.
Your desktop can hold animated icons, sound, cursor-over events, buttons, wallpaper, multiple images, text, and other elements. And you may spread the desktop across multiple password-protected pages, so you’ll have much more room to arrange your shortcuts, pictures, etc. Single icons or buttons can be used to launch programs, open a browser, jump to another desktop page, ask for user input, display a menu of choices, perform a series of actions, reboot the system, and much more. You may also specify applications to launch both on system startup and shutdown, or on a time-delayed basis.
A handy Task Bar applet is included which can replace the Windows Task Bar and Tray. It may be moved anywhere on the screen, and also allows you to switch running applications into their own virtual desktop space. A Password/Info keeper option gives you instant access to passwords or other frequently used information.
And SecurDesk! LV comes in versions for both Windows 3.1/3.11 and 95, 98, ME, NT4 or 2000 (both 16-bit and 32-bit versions included with purchase), so you can have the same environment when moving between systems.
SecurDesk! LV is the ideal replacement for those who need to prevent Windows or users from rearranging the desktop, for those who wish to create their own simpler desktop interface, and for power-users who want more control over their systems.
ZipWrangler: The simple, quick and free way to extract and create your own zip and other archive files. Use ZipWrangler’s Viewer to take a look into these files before you decide whether or not to run or extract the contents. You can also Run program from within the archive without extracting. And you can use ZipWrangler to easily create your own compressed files for making them faster to send over the internet or by e-mail.
Upgrade your ability to extract and view .Zip and .CAB archives with this free utility.
While you are welcome use this version as long as you like, at no cost, there is also an enhanced version available at low cost (under $12). The enhanced version adds ability to directly send compressed files via email, removes the small CursorArts banner at the top of the screen, etc. You can obtain the enhanced version from our on-line resellers. The free version is not so-called “spyware” and we do not collect or transmit any information from your system. See Privacy Policies document for more information about this.
FileWrangler is a complete solution for your Windows file handling needs: the quick and easy way to rename or re-date groups of files, ZIP and UNZIP files, view and extract compressed CAB archives, split a large file across multiple disks, locate files, and much more! In addition to common tasks such as copying, moving and deleting files on your disk, FileWrangler adds many more features, including copying to/from FTP sites; creation of self-extracting (EXE) zip or self-describing and extracting, encrypted LOK archives; on-board text, paint and HTML editors; protection of important files; a file viewer that even looks into ZIP files or files on FTP directories; etc. Use it with, or instead of, Windows Explorer to handle all your file needs.
Of particular interest to many users will be FileWrangler’s Document-centric view option This allows you to hide the sometimes confusing clutter of program and utility files which inhabit your disks. You can arrange just the document files you actually work with (such as word processing files), into their own individual file drawers. Aside from the hiding the confusing array of irrelevant file types, this option can also help keep new users from unwittingly deleting important files from the system (the infamous: “I didn’t know what it was, so I erased it.”).
Plus, FileWrangler allows you to choose between a compact “File List” view and hierarchical “Tree” views. You can even have different viewing modes display at the same time within different FileWrangler windows. Preview file contents as you browse through the files and folders on your system. Play WAV files, AVI’s, view and edit images and more, from right inside FileWrangler.
A handy on-board text editor is always just a click away. It is great for typing quick notes, modifying your system’s configuration files, etc. A specialized markup editor is also available for coding html and other text files (we’ve used it to create this and other web pages on this site), and you can edit many types of graphic images with the included paint program.
Other useful features include:
Then there are FileWrangler’s security options. You can password-protect access to FileWrangler and to its configuration settings. You may also hide types of files and entire drives from users. You may also disable such potentially disastrous file manager functions as deleting files, disk formatting, modifying file attributes, disk copying, etc.
Download FileWrangler today. You’ll wonder why you’d ever use anything else!
ActivIcons makes it simple to change properties for various icons on your Windows desktop and in Explorer, plus attributes for many other desktop settings. You can save and restore the desktop layout, repair corrupted icons, increase the size of the Windows icon cache to prevent future problems, and much more.
You can substitute your own icons for the standard Windows icons and cursors. In fact, ActivIcons goes through your Registry and lists out all of the icons found there, so that you can change those as well. You can even use ActivIcons to display animated icons on your desktop, or make the icon text labels transparent.
And best of all, you can use ActivIcons for as long as you wish, free of charge!
Your desktop computers store a constantly increasing amount sensitive information — everything from bank accounts and financial reports, to confidential client and patient records, to trade secrets and proprietary processes, to your personal identity for accessing private accounts over a network or internet.
Not so long ago, you would have stored this kind of private information in an steel-doored safe, locked cabinet, or bank deposit box. But today many of the computer systems which contain these important materials are sitting completely or only partially protected, and can deliver this information to anyone at the click of a switch and a few keystrokes. It is a simple task for even an amateur to by-pass a login password, take your private information (or information which others have entrusted to you), destroy your files and setup, and create general havoc — all in a few short minutes of tinkering. You are left with the costly process of trying to determine what was compromised, trying to reconstruct your setup, changing accounts … or even worse.
SecurDesk! comprises four separate main modules: Desktop, Task Manager, File Manager and Administration Manager. Together they offer a wealth of options which may be used alone, or in conjunction with other security measures, to control access to sensitive files and settings, replace Explorer.exe (not Internet Explorer, but the Windows desktop and file manager combo which so often presents a wide-open gateway to your files and setup), verifying who is using your machine, hide confusing and irrelevant items from selected users, ease training tasks, track sytstem usage, etc.
SecurDesk! allows you to construct your own desktops with multiple levels of passworded access. It contains its own powerful file manager with built-in security, a task manager/Start bar replacement and the tools you need to configure an environment suited to your unique needs and security concerns.
 for Art, Images, Photos and more
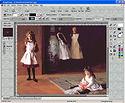
Convert images from one format to another, acquire images from scanners and digital cameras, Create and manipulate image layers, Merge images using different effect filters and transparency, create 3D titles and shapes, remove red-eye and other imperfections from photos, apply special effects filters, use custom brushes and natural media (watercolors, oil paint, etc.), produce your own animations (.GIF, .AVI, etc.), make your own web art and screen savers, and much more.
Whether you simply need to change image formats, create an animation, or produce your own illustrations, ImageForge GOLD gives you the tools you need at a price which is a mere fraction of that charged for similar programs. Don’t believe us? Try ImageForge GOLD today, and see it in action for yourself. Click here to download and try a copy on your own system.
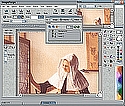
ImageForge provides you with a set of powerful tools for painting and editing images, photos or other graphics.
Create and edit images, acquire pictures from your scanner, digital camera or other Twain-compliant device, apply special effect filters, produce your own photo albums and simple slide shows, and much more.
Upgrade your ability to edit images with this free paint program.
Merge images, create 3D titles and shapes, remove red-eye and other imperfections from photos, apply special effects filters, use custom brushes and natural media (watercolors, oil paint, etc.), produce your own animations (.GIF, .AVI, etc.), make your own web art, and much more.
Whether you simply need to change image formats, create an animation, or produce your own illustrations, ImageForge PRO gives you the tools you need at a price which is a mere fraction of that charged for similar programs. Don’t believe us? Try ImageForge PRO today, and see it in action for yourself. Click here to download and try a copy on your own system.
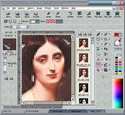
IconForge is simply the best, most complete suite to create or change icons, cursors, animated cursors and icon libraries for Windows. Optimized for editing small images, you will find a full set of painting tools at your disposal. You can import from and export to a variety of other image, icon and animation types, so you can take advantage of work which you’ve already created or scanned from other sources.
IconForge is also an excellent tool for other graphics, such as producing bookmark/favorites icons for a web site, repeating tiles for wallpaper backgrounds, animated GIF bullets to make listings stand out, or cursors for various projects.
You also get tools for changing Windows’ default icon, cursor and desktop settings, plus a utility for handling those documents or other files which do not have unique icons. IconForge even makes a fine editor for handling your photos and other non-icon images. XP-style Alpha-channel icons, as well as a variety of other icon and image formats, are supported.